 To create exciting (water)drop photos, I need a setup to control the frequency and timing of the water drops falling and splashing onto each other. There are some solutions available, but they are quite expensive in my opinion. Maybe I’ll think differently after completing my DIY project.
So, I decided to build my own water drop setup. When I talk about “water drop,” I also mean other types of liquids, as long as they don’t explode. I will update this page throughout the DIY project, which started on November 7th with finding a suitable solution. As of December 11th, 2010, the water drop device is ready in its initial version.
Pictures taken with this setup can be found here. Specific information can be found at:
Parts Required
There are some basic parts I need for the water drop setup:
- Water tank
- Electric valve
- Main controller
- Some interfaces
- Mounting installation
Creating a sturdy mount and a water basin isn’t the challenging part of this project, so I’ll save that for later. The main interest lies in the electric valve that needs to open and close quickly to create a water drop at the moment I want it. I also need some parts to control this valve, as well as the shutter of the camera and the flash. For this, I’ll need a microcontroller or computer. To connect everything together, I need interfaces that can handle the current and voltages of the components used.
Controller
My initial thought was to use a regular parallel port (old Centronics printer port) on an old laptop, connected to the electric valve, camera, and flash to control the setup. A simple MS-DOS or Linux application written in C++ should do the trick. However, I’m not completely convinced that the parallel port can handle the resolution I need (0.5 milliseconds). The operating system should support real-time processing to avoid accidentally delaying the time intervals.
Since having a laptop near a water setup isn’t ideal, and I have experience programming microcontrollers, I decided to look for a microcontroller-based solution. A microcontroller is a combination of a microprocessor and the necessary controllers for memory and input/output, all in one chip. I found the Arduino Uno, which is relatively cheap (€25), has an open-source programming environment, and appears to handle microsecond resolution in addition to milliseconds. This means more accuracy in the timing of the drops. It has many input/output ports, with enough to connect an LCD display in the future.
The Arduino Uno board arrived within 2 days, and programming is relatively easy if you’re familiar with a C-like language. The prototype used a serial (USB) connection to the PC for receiving input like program choice and entering delays. Later on, I replaced the serial communication with an LCD display and keypad, so the device can be used without a PC.
Solenoid Electric Valve
 Finding a suitable valve can be difficult if you’re unsure what to look for. The Shako PU220AR01 is used by others for creating water drops, and I can confirm it is a suitable solenoid valve. The valve will be connected to a hose from a water tank and will open with an electronic pulse from the microcontroller. The amount of time the valve stays open will determine the size of the drop.
I ordered my valve from APEX Industrial Supply in the US. Make sure to get the right voltage (they have 110 volts AC and 24 volts DC; I recommend the latter for safety). I received the valve within 3 business days (from the US to the Netherlands).
You’ll also need some brass hose pipes for the valve. I recommend reading this page and starting your search there. Product numbers can also be found on that page.
Sound Interface
To spend more time programming and experimenting without the solenoid valve, I decided to build a sound interface to trigger the camera shutter after detecting a loud sound. During the last few days, I’ve found more sites where the Arduino is used for high-speed photography. I plan to program mine myself, but the information on specific interfaces or sensors has been useful. I found this PDF with a sound detection circuit that works with contact noise (e.g., placing the microphone on a table and dropping something on it). Popping a balloon also works, though I’m not entirely satisfied with it yet.
The sound interface can be connected to the Arduino Uno.
Remote Shutter Cable
To trigger the camera shutter, you need a wired connection. I found a wired remote shutter trigger for $3.50 from Hong Kong with free shipping. The quality of the switches doesn’t matter to me since I just need to cut off the cable and connector. The cables themselves are of good quality. I smashed the switch to look inside and figure out the wiring and how the switch works.
- Wire A will connect to Wire B when the button is pressed halfway (Auto Focus).
- Pressing the button further (triggering the Shutter) also connects Wire C.
Autofocus = Wire A + Wire B
Shutter = Wire A + Wire B + Wire C
Again, check the switch to see which wires to connect for autofocus and/or shutter.
Interfacing with Flash and Shutter
I use three optocouplers, each connected to a digital output pin on the Arduino to trigger the flash, autofocus, and shutter. I used the 4N25.
Water Tank
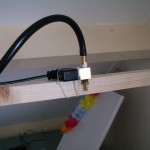
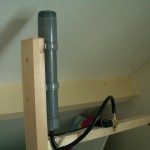 You should create a Mariotte Siphon to provide stable pressure to the valve. I used a regular PVC drain pipe with a 5 cm diameter. You can buy standard caps to close such pipes and glue them together. I also found a screw mount cap for this drain pipe, which is very useful when you need to empty the tank. Hosepipes for the setup can typically be found in a pet store (aquarium supplies).
Costs & Alternatives
When I started writing this article, I had only found pre-built systems priced at 400. If you have enough electronics and programming knowledge, you should be able to build a microcontroller-controlled system yourself for half that price. The basic parts are inexpensive, but it becomes more expensive if you want to put everything in a nice case, add an LCD display, and include a keypad. However, a 20x4 LCD and 16-key keypad can be bought on eBay for about $15. All the small costs add up quickly.